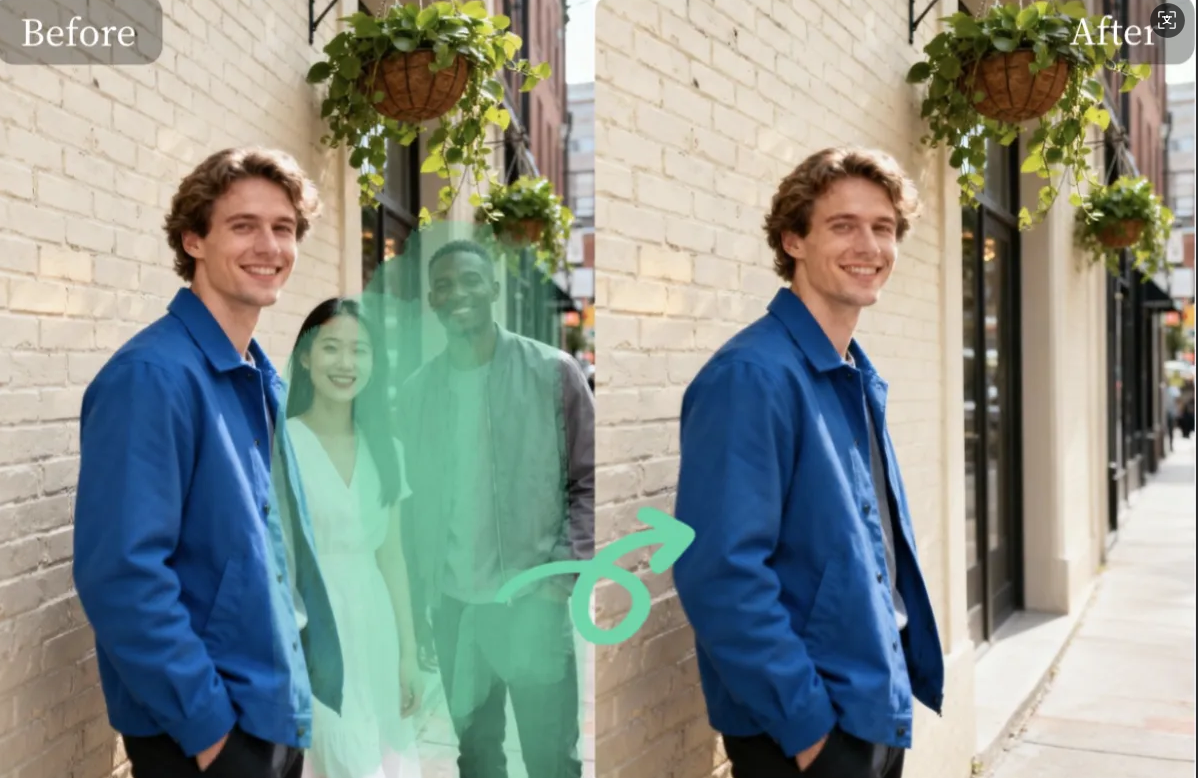
Product photography is all about presentation. When you sell clothes online, you want the fabric to look like it is being worn by a person, but seeing a plastic mannequin can distract your customers. The goal is to make the clothing the star of the show. Many professional studios use a technique called the ghost mannequin effect to make clothes look three dimensional without showing the support structure.
You can achieve this professional look without spending hours in complicated editing software. Using a Magic Eraser allows you to quickly remove unwanted objects from your frames. This tool uses artificial intelligence to look at the pixels around an object and fill in the space naturally. It is a great way to clean up your product catalog if you are on a tight budget or have a lot of images to process.
If you have many photos that need touch-ups, a Free AI Image Editor is the best place to start. These tools are designed to be simple so that anyone can use them. You do not need a degree in graphic design to get high quality results. All you need is a clear photo and a few minutes of your time to brush away the parts of the image that do not belong there.
Removing props and mannequins helps create a consistent look across your entire online store. When every item is displayed against a clean background, your brand looks more trustworthy. Customers are more likely to buy when they can clearly see the shape and texture of a garment. AI tools have made this process accessible for small business owners who used to have to pay expensive freelancers for the same work.
The process of using AI to fix your photos is called in-painting. The software identifies the patterns, colors, and textures in your background. When you tell it to remove a mannequin arm or a stand, it calculates what should have been behind that object. This creates a seamless look that makes it appear as though the clothing is floating in mid-air.
Preparation is the first step in any successful photo edit. Before you even open your computer, make sure your original photos are as clean as possible. Use a solid white or grey background when you take the picture. This makes it much easier for the AI to understand which parts are the background and which parts are the product. If the background is too busy, the tool might get confused and leave behind blurry spots.
Step 1: Choose Your Image and Tool
Start by selecting the photo you want to edit. It is best to use high resolution images because they contain more data for the AI to analyze. Once you have your file ready, open your chosen AI eraser in your web browser. Most of these tools do not require you to download any heavy software, which saves space on your computer and allows you to work from anywhere.
Step 2: Upload the File
Locate the upload area on the website. You can usually drag and drop your file directly into the browser window. Wait a few seconds for the image to load completely. You should see your photo displayed in a large editing area with a set of simple tools on the side or top of the screen.
Step 3: Adjust the Brush Size
Most AI editors give you a brush tool to highlight the areas you want to remove. You should see a slider that lets you change the size of this brush. Use a larger brush for big areas like the torso of a mannequin. Use a smaller brush for tight spots like the area between a sleeve and a stand. Precision is important here because you do not want to accidentally highlight the clothing itself.
Step 4: Highlight the Mannequin or Prop
Carefully paint over the mannequin or the props you want to disappear. You will usually see a colored highlight, often red or green, covering the area you have selected. Make sure you cover the entire object, including any small stands or wires that might be visible. If you miss a spot, the AI might leave a floating piece of plastic in your final image.
Step 5: Run the Eraser
Once you have covered everything you want to remove, click the button to process the image. This button is often labeled as Erase or Process. The AI will take a few moments to think. It is looking at the edges of your clothing and the texture of your background to create a perfect match. When it finishes, the mannequin should be gone, leaving only the garment behind.
Step 6: Refine the Results
Sometimes the first pass is not perfect. You might see a little bit of a shadow or a blurry edge where the mannequin used to be. Do not worry because you can usually brush over those small areas again. Repeat the process until the background looks perfectly smooth. It is better to do two or three small edits than one giant messy one.
Step 7: Download Your Clean Photo
When you are happy with the look, click the download button. Most tools will let you save the file as a JPG or PNG. If you plan to do more editing later, a PNG is often better because it preserves more detail. Now you have a professional product photo that is ready for your website or social media pages.
Comparison of Editing Methods
| Feature | AI Eraser Tool | Manual Masking |
| Time Required | 30 seconds | 20 minutes |
| Skill Level | Beginner | Professional |
| Cost | Free | Paid Subscription |
| Software | Web Browser | Desktop App |
| Consistency | High | Variable |
Tips and Best Practices for Better Results
To get the best results, pay attention to your lighting. If the mannequin casts a very dark shadow on the wall behind it, the AI has to work harder to remove that shadow. Try to use soft, even lighting when you take your photos. This reduces the amount of work you have to do during the editing phase.
Always zoom in when you are working on the edges of the fabric. If you accidentally erase part of the clothing, the shape will look unnatural. Most AI tools have a zoom function or a magnifying glass icon. Use it to get close to the seams and buttons. This ensures that the final image looks like a real piece of clothing rather than a digital cutout.
Keep your brush strokes steady. If you are using a mouse, it can be helpful to do small sections at a time. If you make a mistake, look for the undo button. It is much easier to undo a small stroke than to start the whole process over because you slipped at the very end.
Common Mistakes to Avoid
One of the biggest mistakes people make is using a brush that is too large. While it is faster to cover the mannequin with a giant brush, you will likely catch the edges of the product. This leads to warped lines and missing fabric. Take your time and use a smaller brush for the detailed areas around the neck and sleeves.
Another mistake is ignoring the shadows on the floor. If you remove a mannequin but leave its shadow on the ground, the photo will look fake. Customers might not know exactly what is wrong, but they will feel that the image is off. Always look for shadows that the mannequin or props might have left behind and erase them as well.
Do not try to edit photos that are too dark. If the AI cannot see the difference between the mannequin and the background, it will not be able to remove it cleanly. If your photo is dark, try to brighten it slightly in a basic editor before you use the AI eraser. This helps the software distinguish between the different elements in the frame.
Conclusion
Removing mannequins and props no longer requires a massive budget or complex skills. With the right AI tools, you can transform your product photography in just a few clicks. This allows you to focus more on growing your business and less on tedious editing tasks. By following these steps, you can create a clean, professional look that helps your products stand out and gives your customers the confidence they need to make a purchase. Clean images lead to better engagement and higher sales, making this a vital skill for any online seller.