You’ve hiked for hours to reach a stunning overlook, the golden light is fading fast, and you raise your camera only to end up with another blurry, disappointing shot. It’s a frustration nearly every amateur photographer knows—shaky hands, unstable surfaces, and the rush of fleeting moments conspire against you in the outdoors. An ultra-lightweight tripod for hiking and camping can change all of that. This single piece of gear bridges the gap between the photos you imagine and the ones you actually capture. In this article, we’ll help you elevate your outdoor photography by choosing and using the right tripod for your adventures. Whether you’re shooting sunsets from a mountain ridge, capturing star trails at a remote campsite, or simply want sharper images without hauling heavy equipment, the right tripod offers both portability and rock-solid stability. We’ll walk through essential features, scenario-based selection tips, and practical techniques so you can start getting the shots you’ve been chasing on every trail and trip ahead.
Why an Ultra-Lightweight Tripod is Essential for Hiking and Camping
Every ounce matters when you’re covering miles on foot. Experienced hikers know the difference between a pack that feels manageable at the trailhead and one that becomes punishing by mile five. Traditional tripods often weigh three pounds or more—enough to make you leave them behind entirely. An ultra-lightweight tripod for hiking and camping typically comes in under two pounds, sometimes closer to one, which means you’ll actually carry it instead of debating whether the extra weight is worth the trouble. And gear left at home can’t improve your photos.
Beyond comfort, a lightweight tripod directly solves the technical problems that plague handheld outdoor photography. Camera shake becomes unavoidable in low-light conditions—dawn, dusk, dense forest canopies—exactly the moments when landscapes look most dramatic. Even steady hands introduce micro-vibrations at shutter speeds below 1/60th of a second, turning what should be a crisp mountain panorama into a subtly soft disappointment. A tripod eliminates this entirely, giving you the freedom to shoot long exposures that capture silky waterfalls, light trails from campfires, or the Milky Way arching over your tent.
For amateur photographers looking to grow their skills, a tripod also forces slower, more intentional composition. Instead of snapping quickly and moving on, you frame deliberately, check horizons, and consider foreground elements. This mindset shift alone produces noticeably better images. The ultra-lightweight tripod for hiking and camping isn’t just a stabilization tool—it’s a creative catalyst that opens up techniques impossible to achieve by hand while keeping your pack light enough to actually enjoy the journey.
Key Features to Look for: Ball Head Tripods and Portability
Understanding Ball Head Mechanisms for Versatile Shooting
A ball head tripod uses a single spherical joint that lets you swivel your camera in any direction and lock it into position with one knob. This matters outdoors because scenes rarely cooperate with rigid, multi-handle pan-and-tilt heads. You might need to angle steeply downward into a canyon, tilt up toward a cliff face, or quickly recompose when wildlife appears at the edge of your frame. A quality ball head holds its position without creeping under the weight of your camera, so look for one with a separate panning base and a tension control that lets you dial in smooth resistance for precise adjustments rather than the camera flopping loosely until you clamp down.
What Makes a Tripod Truly Portable for Adventures
Portability goes beyond the number on a scale. A truly portable tripod for hiking folds down to a compact length—ideally short enough to strap to the side of a daypack or slip inside it entirely. Carbon fiber construction shaves significant weight compared to aluminum while adding vibration dampening, though aluminum models remain a solid budget-friendly option. Pay attention to the folded mechanism: reverse-folding legs wrap around the head column, reducing packed length by several inches. Leg lock style also affects field usability—twist locks are sleeker and less prone to snagging on brush, while flip locks let you deploy legs faster with gloved hands in cold conditions. Finally, check the weight capacity relative to your camera and heaviest lens combination. A tripod rated for at least twice your gear’s weight provides a safety margin against wind gusts and uneven ground that would otherwise compromise stability on exposed ridgelines or rocky stream banks.
How to Choose the Right Tripod for Different Scenarios
Not every outdoor shoot demands the same setup, so matching your tripod to the situation saves frustration and money. Start by identifying the type of photography you do most often, then work through these practical considerations to narrow your choice.
For landscape photography on day hikes, prioritize maximum height and stability in wind. You want a tripod that extends to eye level without raising the center column, since an extended column acts like a lever that amplifies vibrations. A model with spiked feet or interchangeable rubber-to-spike tips grips rocky summits and loose gravel far better than flat rubber pads alone. If you frequently shoot wide panoramas, confirm the ball head offers a dedicated panning base with degree markings so you can stitch frames consistently.
Self-portraits and group shots at camp require a different emphasis. Here, a self-portrait tripod with flexible leg angles becomes invaluable—you need to set it on picnic tables, wedge it between roots, or position it on sloped ground where standard leg spreads won’t level out. Look for independent leg angle adjustments with at least three locking positions per leg. Bluetooth remote compatibility or a built-in intervalometer on your camera pairs perfectly with this setup, letting you trigger the shutter from twenty feet away without sprinting back and forth.
Night photography—star trails, Milky Way compositions, campfire scenes—demands rock-solid stability above all else because exposures can run from fifteen seconds to several minutes. Weight capacity matters most here; a tripod that barely supports your camera will transmit every breeze into your frame. Choose a model with a hook on the center column where you can hang your pack as a counterweight. Twist-lock legs tend to hold more securely during long, undisturbed exposures than flip locks, which can occasionally loosen from temperature shifts overnight.
For action-adjacent scenes like flowing rivers or wildlife at a distance, quick deployment wins. Flip-lock legs that snap open in seconds let you catch a deer at the water’s edge before it bolts. Pair that with a ball head featuring a quick-release plate so you can mount and dismount your camera without fumbling. Assess your heaviest lens—if you carry a telephoto for wildlife, ensure the tripod’s rated capacity exceeds that combined weight by a comfortable margin, because longer lenses magnify even minor instability into unusable softness.
Photography Tips Using Your Portable Tripod
Once you have your tripod on location, a few deliberate techniques will dramatically improve your results. Start every setup by pressing the tripod feet firmly into the ground and confirming the bubble level before touching your camera. On soft soil or sand, push each leg down until it stops sinking—rushing this step is the most common reason outdoor shots still come out soft despite using a tripod.
For sharper images in any condition, use a two-second shutter delay or a remote trigger instead of pressing the shutter button by hand. That small press introduces enough vibration to soften a long exposure, and it’s an easy fix that costs nothing. When composing self-portraits at camp, switch to your camera’s intervalometer or connect a Bluetooth remote so you can position yourself naturally without racing a ten-second timer. Set the tripod at chest height and angle the ball head slightly downward for a more flattering perspective rather than shooting from below.
Experiment with your tripod’s lowest leg spread to get ground-level angles that most hikers never capture—wildflowers filling the foreground with a peak behind them, or a reflection shot inches above a still alpine lake. These perspectives add depth and originality to images that would otherwise look like every other snapshot from the same overlook. On windy ridgelines, hang your pack from the center column hook and position yourself as a windbreak on the upwind side. Combining these photography tips with consistent practice on each trip builds muscle memory, so setting up becomes second nature and you spend less time fiddling with gear and more time capturing the moments that drew you outdoors in the first place.
Practical Solutions for Hobbyists: A Step-by-Step Guide
Turning knowledge into action requires a clear process. Start by auditing your current gear and shooting habits. Write down the camera body and lenses you carry most often, total their weight, and note the types of shots you miss most frequently—blurry long exposures, awkward group photos, or soft wildlife images. This simple inventory tells you exactly what weight capacity and features your tripod needs to address.
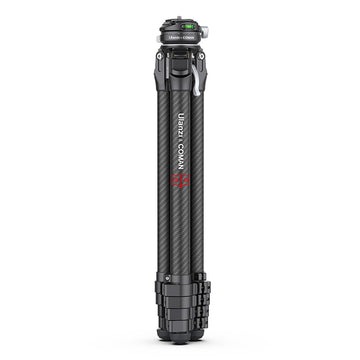
Next, research models that fit your weight and packed-size budget. Brands like Ulanzi offer a range of compact travel tripods designed with hikers in mind, and reading user reviews from outdoor photographers specifically—rather than studio shooters—will give you a much clearer picture of real-world field performance on dirt, rock, and wind. Once you’ve purchased your tripod, practice setting it up at home until you can deploy it in under thirty seconds. Rehearse adjusting leg angles independently, leveling the ball head, and attaching your camera via the quick-release plate—all with cold or gloved hands if you shoot in cooler seasons.
On your first trip out, tackle the most common challenge: uneven terrain. Place two legs downhill and one uphill, then shorten the uphill leg until the head is level. For soft ground near lakeshores or meadows, press each leg firmly until it stops settling before mounting your camera. In low-light conditions, hang weight from the center column hook and use a remote trigger to eliminate every source of vibration. After each outing, review your images at full zoom on a computer screen to identify remaining softness and adjust your technique accordingly. This feedback loop—shoot, review, refine—transforms a simple equipment purchase into a genuine skill upgrade that compounds with every adventure.
Start Capturing Sharper Outdoor Images on Every Adventure
An ultra-lightweight tripod for hiking and camping removes the most common barrier between you and the sharp, compelling outdoor images you want to create. We’ve covered why shedding weight matters for both your body and your photography, how ball head mechanisms provide the flexible positioning that outdoor scenes demand, and what portability features—folded length, material choice, leg lock style—actually affect your experience on the trail. Matching your tripod to specific scenarios, whether that’s windswept ridgeline panoramas, campsite group portraits, or long-exposure night sky compositions, ensures you’re not fighting your equipment when conditions get challenging. The practical techniques and step-by-step process we outlined give you a clear path from purchase to consistent results in the field. Now it’s your turn to act on this. Assess your current gear, identify the shots you keep missing, and invest in a tripod that fits your pack and your ambitions. Your next hike doesn’t have to end with the same blurry disappointments—bring the right support, practice the fundamentals, and start capturing the images that match what your eyes actually see out there.