Most times, fitted sheets are good options for our beds, but often become a challenge for our closets. Imagine a case where the elastic corners do not seem to align; if you have ever attempted to fold a sheet like this, you will know how challenging it can be. Many times, it will seem like a wrinkled ball, since many people will just give up and roll their fitted sheet into a ball, put a rubber band around it, and put it away as a bundle. But know this, that not only does a poorly folded fitted sheet look messy, but it will also take up too much space in your closet, and it can get annoying every time you go to get sheets for fresh bedding. This guide will show you the easiest way to fold a fitted sheet that looks neat, fresh, and ready to use.
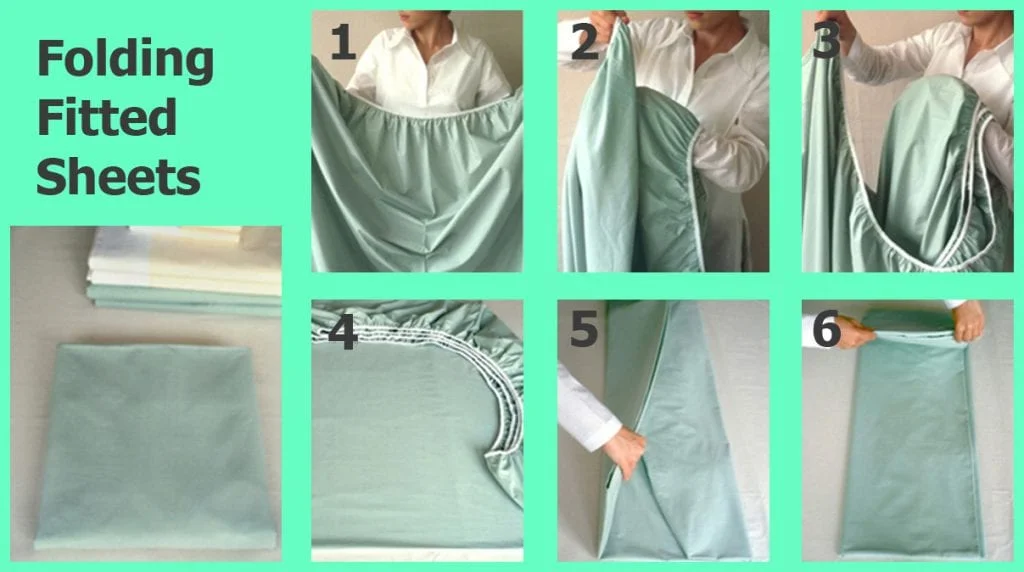
Step 1: Lay the Sheet Flat and Find the Corners
The very first step to folding a fitted sheet correctly is to find adequate flat space, and this can be a clean bed, a long table, or even the floor. Then you should spread the sheet out with the elastic edge facing you. Stop for a moment and position yourself in a way that you can locate all four corners. Elastic is what makes the fitted sheet special from just an ordinary sheet, and that elastic is also what makes the sheet challenging. Rather than struggling with the sheets, learn to adjust to the elastic by using the functional parts of the elastic in the sheets. Take your hands and slide them into the two corners on the shorter edge of the sheet. By doing this, you are in the shaping phase, and now you must have been getting to have some control and shape to the sheet, which is the first real step to folding and the first step to securing the shape of the fold. Think of this as setting up the sheet and prepping for a more geometric shape – rectangle, square, or a progressively more structured fold shape. From here on out, once you have established a more geometric shape, the rest of the process just becomes easier.
Step 2: Tuck the Corners Into Each Other
After you have secured your first two corners, your next step is to tuck those corners together in a clean manner. You need to take one corner with your left hand and fold it over the other one in your right hand. Then the fabric should line up close together, and both seams should be next to each other or very closely together. After this, what you have to do is to fold the third corner up into the first two, and then repeat with the fourth corner. At this stage, the four corners are sitting on one another, and the sheet should be much less crinkly. The only thing you need to focus on is making sure the elastic edges line up; this keeps the sheet flat and not puffed out. This is a great method because it eliminates the very common issue of having sheets twist and bulge when they are folded. Once you have stacked the corners, you have a manageable process.
Step 3: Create a Rectangular Shape
Now that we have them all tucked in together properly, we need to lay the sheet out in a more recognizably rectangular shape. Lay the sheets out on the flat surface you are using, and tuck down the corners and smooth out with your fingertips. What you will actually be making is a rectangle or square, and not let the elastic curl the outer shape. At this point, the sheet should have changed into a piece of fabric that you can manage instead of a sheet that does not want to fit anywhere. The goal is to leave the corners under control and make a square base to continue folding. Doing so will help ensure the next fold will be flat.
Step 4: Fold the Sheet Into Thirds
After you finish the rectangle, you should arrange the fitted sheet into long thirds. First, you would be bringing one end of the sheet to the middle, then laying the other end down on top of it. Use your hands to smooth the sheet as you work, and be sure to make sure the elastic will be inside the folds. To be clear, it is better to fold into thirds as opposed to folding in half; this will create a narrow and cleaner line to stand in your linen closet. Your sheet will look like a folded flat sheet. The difference is that in the folds, the elastic is tucked away and not very visible; you will end up with a smoother finish.
Step 5: Finish With a Compact Fold
The last thing we need to do is fold the long rectangle into a smaller square or rectangle that you can tuck away in the way you store your linens. How do you do this? You do this by considering how big your fitted sheet is, whether twin, queen, or king; you can fold it once or twice until it measures the same length and width as the rest of your bedding. With one hand on top and one underneath, press ever so slightly to flatten out the entire surface of the fitted sheet. Store it on your shelf or in a storage basket until you have several perfectly folded sheets together. It not only will make your closet look tidy, but it will save you time every time you change your bed. If you are already used to finding wrinkled fabric piled high together, you will be grateful for this effort every time you need linens, because you will have a neat pile of folded sheets always.
Conclusion
All that time that was previously spent sorting through messy linen closets and folded sheets now becomes time spent enjoying making use of neatly folded sheets. A visitor is sure to appreciate the effort, as they are now surprised at the linen you have provided them for their visit. This effort will definitely help keep more money in your pocket in the future by preventing damage due to poor sheet storage and also prolonging the lifespan of your sheets, so you don’t need to buy new sheets every time they need a wash or are stored incorrectly and become damaged. For those who want to get the quality fitted sheets that fold perfectly and retain their shape wash after wash, we have you covered at LatestBedding with outfitted beds designed with the finest elastic constructions and durable fabrics. Our bedding will make folding a fitted sheet all the easier, while giving you the comfort and durability all bedrooms deserve.
Read More Gorod