For decades, PowerPoint has been the backbone of presentations across classrooms, boardrooms, workshops, and training halls. Its simple interface, structured formatting, and visual flexibility make it one of the world’s most dependable tools for communication. But today’s audiences, students, employees, trainees, clients, and event attendees, expect a presentation to be more than just a sequence of static slides. They want interaction, real-time engagement, and the chance to participate actively.
This is exactly why interactive platforms have become essential for modern presenters. They transform traditional slides into two-way experiences, helping presenters capture attention, collect responses instantly, and maintain engagement throughout a session.
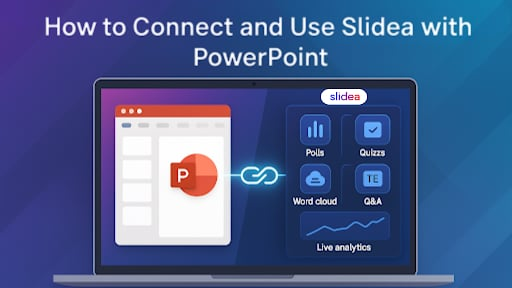
One of the most useful advancements in this space is the ability to connect Slidea with PowerPoint. This integration blends PowerPoint’s familiar slide-building environment with interactive capabilities like polls, quizzes, ratings, word clouds, live Q&A, and detailed analytics. And the best part, it works seamlessly within the PowerPoint interface, so presenters don’t need to learn an entirely new tool or recreate their slides from scratch.
This comprehensive guide explains, step by step, how to connect and use the interactive presentation tool with PowerPoint. Whether you’re a teacher, trainer, manager, speaker, or event organizer, this guide will help you understand the workflow, features, benefits, and best practices for using both tools together.
Why Connect an Interactive Platform With PowerPoint?
Before diving into the steps, it’s helpful to understand the value behind the integration. Here are the most impactful advantages:
1. No Need to Rebuild Existing Slides
Most professionals already have PPT decks developed over months or years. Rebuilding them in a new interface can be exhausting. Integrating an interactive tool ensures you can use your existing content instantly while enhancing it with modern features.
2. Access to Interactivity Without Changing Workflow
Polls, quizzes, feedback slides, word clouds, and Q&A sessions are essential for engagement, but switching platforms to add these can disrupt workflow. This integration lets you embed these features right inside PowerPoint.
3. Smooth Presentations Without Switching Tabs
Presenters no longer need to juggle multiple screens or tools. Everything, from designing slides to opening interactive sessions, can be managed from one unified space.
4. Professional Visuals + Real-Time Interaction
PowerPoint remains unmatched in design control. Adding an interactive layer on top helps presenters create content that looks polished and feels dynamic.
5. Works for Online, Offline, and Hybrid Sessions
Whether presenting in a physical classroom, a virtual training session, or a hybrid meeting, the integration allows smooth participation through a simple join link.
Step-by-Step Guide to Connecting and Using the Platform With PowerPoint
Below is a simplified yet detailed walkthrough of the entire process.
Step 1: Install the PowerPoint Add-In
To begin, install the add-in directly from Microsoft PowerPoint.
How to Install
- Open PowerPoint.
- Go to the Insert tab.
- Click Get Add-ins or Store.
- Search for Slidea.
- Click Add and accept necessary permissions.
Once installed, you will see a new tab in your PowerPoint menu. This brings the interactive system’s tools directly into your slide workspace.
Why This Matters
This setup allows you to enable interactive capabilities without ever leaving PowerPoint, eliminating the need to switch between interfaces.
Step 2: Log In to Your Account
To activate the integration and sync your presentation, log in.
Steps
- Click the new tab that appears in PowerPoint.
- Select Login.
- Enter your credentials.
- If you’re new, you can sign up instantly.
Why It’s Important
Logging in connects your PPT file with the interactive platform so your session data, analytics, and activity can be tracked accurately.
Step 3: Upload or Sync Your PPT File
Once logged in, connect your slide deck.
Two Options:
A. Direct Upload
- Choose Upload to Workspace.
- Your PPTX file is transferred to your online space.
B. Live Syncing (in some versions)
- Edit inside PowerPoint.
- Changes automatically sync with your online deck.
What This Step Achieves
Your PowerPoint file becomes available for adding interactive components and for presenting through the online system if needed.
Step 4: Add Interactive Elements to Your Slides
This is where the presentation becomes dynamic.
Common Features You Can Add:
1. Live Polls
Useful to collect opinions instantly.
- Multiple-choice
- Yes/No
- Rating scale
2. Word Clouds
Perfect for brainstorming sessions or idea-sharing moments.
3. Quizzes
Ideal for educators, trainers, and workshop organizers.
- Single correct answer
- Multiple correct answers
Results can be displayed immediately.
4. Q&A Sessions
Participants submit questions anonymously or with names. Great for meetings, training, and webinars.
5. Feedback and Rating Slides
Collect session ratings or suggestions at the end.
How to Add These
- Go to the tab.
- Click Add Interaction.
- Choose your interactive type.
- Customize the question and options.
Each slide is inserted into your PPT deck automatically.
Step 5: Customize Appearance and Design
Consistency matters in presentations. Your interactive slides can be customized to match your design theme.
Editable Elements Include:
- Colors
- Font styles
- Backgrounds
- Icons
- Layouts
Matching your original design maintains professionalism and visual unity.
Step 6: Choose How to Present
There are two main presentation modes.
Mode 1: Present Directly Through PowerPoint
For offline or classroom sessions.
Steps:
- Click Start Session in the ribbon.
- A QR code and a join link appear.
- Share it with participants.
- Present as you normally do in PowerPoint.
Participants respond on their devices, and you see results instantly.
Mode 2: Present Through the Web Dashboard
Useful for:
- Online classes
- Remote training
- Webinars
- Hybrid events
Steps:
- Log in to your dashboard.
- Open the synced PPT deck.
- Start the session.
- Use presenter notes, remote control, and audience analytics.
Both modes provide the same interactivity; the difference is where you prefer to present.
Step 7: Share the Session Link With Participants
Participants can join using:
- Phones
- Tablets
- Laptops
No app installation is required.
Once joined, they can:
- Vote in polls
- Answer quizzes
- Submit questions
- Share ideas
- Provide feedback
Everything updates in real time on your screen.
Step 8: Monitor Live Interactions
During your presentation, you can view:
- Number of people connected
- Poll results
- Word cloud responses
- Quiz scores
- Q&A submissions
- Engagement metrics
Real-time visibility helps you adjust your session style instantly.
Step 9: Review Post-Session Analytics
After the session, detailed analytics become available.
Metrics Include:
- Participation rate
- Individual quiz performance
- Poll responses
- Questions asked
- Session ratings
- Engagement patterns
This data is extremely valuable for:
- Teachers evaluating student understanding
- Trainers measuring training effectiveness
- Managers tracking team involvement
- Event hosts reviewing audience engagement
Best Practices for Using PowerPoint + Interactive Tools
To get the best results, follow these practical tips:
1. Keep Slides Clear and Minimal
Crowded slides reduce readability. Use:
- Short sentences
- Clean visuals
- Ample white space
Let interactivity carry the engagement.
2. Add Interactive Moments Strategically
Spacing them well maintains flow.
Ideal placement:
- After every 5–7 slides
- Before introducing a new concept
- After explaining important points
- During transitions
3. Use Polls as Warm-Up Activities
A simple question at the beginning energizes the room.
4. Present Using Mobile Remote Control
You can change slides, view notes, and manage activities from your phone.
Great for teachers and trainers who move around.
5. Use Quizzes as Learning Checks
Perfect for:
- Classrooms
- Employee skill tests
- Workshops
- Training sessions
6. Encourage Anonymous Q&A
Anonymity increases participation and brings more honest questions.
7. Keep Presentation Flow Natural
Always:
- Introduce the activity
- Give clear instructions
- Show results
- Return to your content smoothly
Who Benefits Most From This Integration?
1. Teachers
- Interactive lessons
- Quick checks for understanding
- Engaging quizzes
- Better student participation
2. Corporate Trainers
- Onboarding programs
- Soft-skill training
- Compliance modules
- Skill assessments
3. Managers & Team Leads
- Project review meetings
- Brainstorming
- Feedback collection
- Decision-making polls
4. Event Speakers
- Conference interactions
- Panel discussions
- Audience Q&A
- Live sentiment checks
5. Startup Founders & Professionals
- Investor pitches
- Product demos
- Walkthroughs
- Stakeholder presentations
Advantages of Connecting Interactive Tools With PowerPoint
- No platform switching
- Easy installation and setup
- Works for both online and offline environments
- Enhances audience engagement
- Reduces presenter workload
- Provides measurable analytics
- Turns traditional PPT slides into dynamic, interactive experiences
Conclusion
Integrating Slidea with PowerPoint is one of the most effective ways to elevate your presentation style without changing your established workflow. You can keep using the PowerPoint environment you are comfortable with while adding powerful interactive elements that make your sessions more engaging, measurable, and memorable.
Whether you are a teacher, trainer, manager, event host, or professional presenter, this combination gives you a modern communication advantage. If your goal is to move beyond static slides and create truly interactive experiences, connecting these two tools is one of the smartest upgrades you can make.